What are the notes nested within some Lights, and how do I add or change them?
BlueNote Messages are the heart of the BlueNote system that one person designs from their computer for use by everyone else. This is where all the timers, sounds, and colors come together to create a discreet yet friendly glanceable intercom for the whole office.
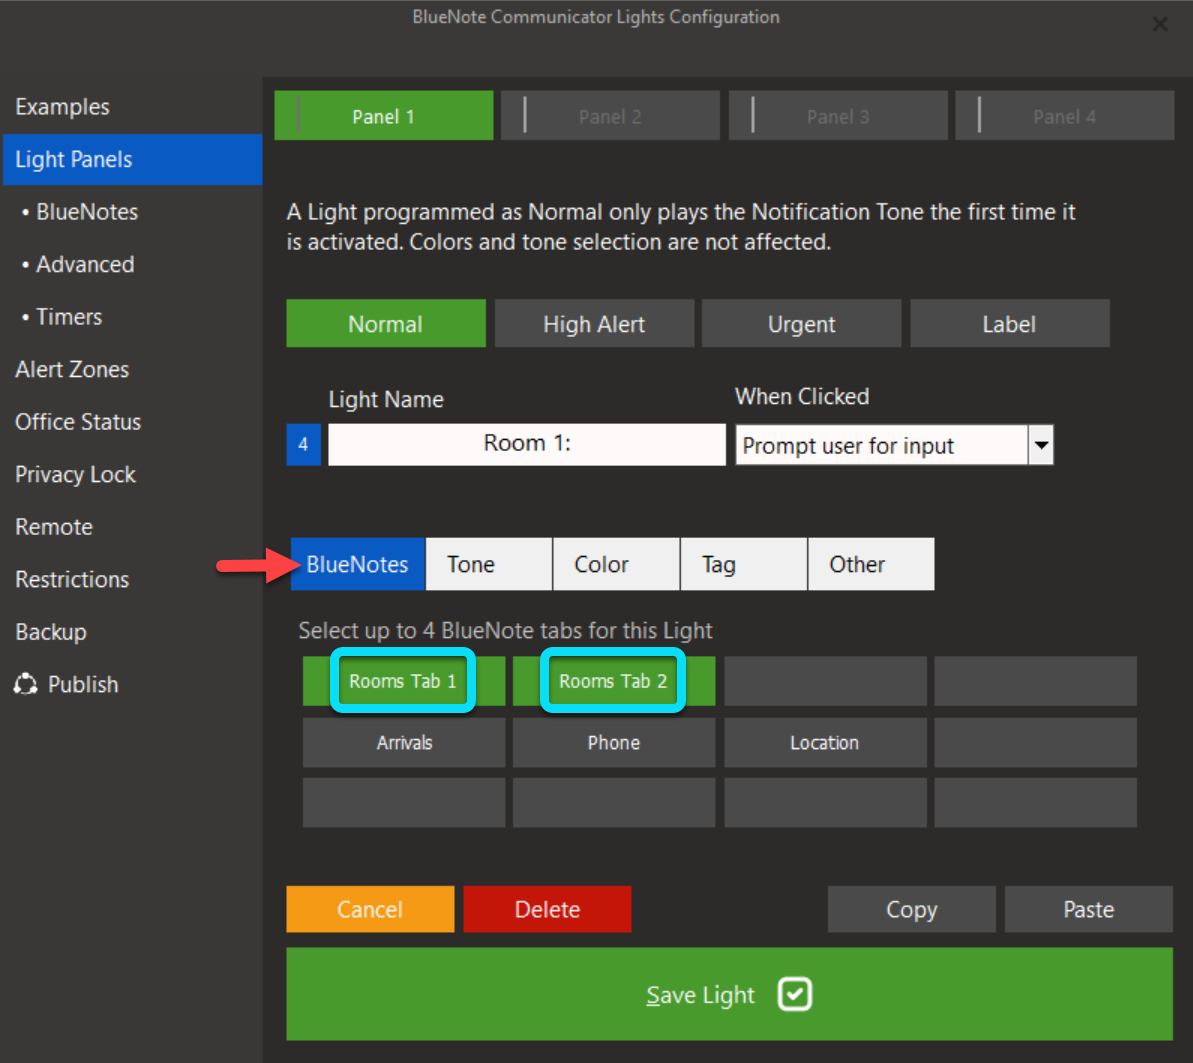
While Lights are the individually labeled notification boxes on the surface of the main communication grid that are shared by all users in the office, there is an option to create secondary menu tabs within the Lights. Each of these internal preset messages are called BlueNotes (BlueNote Messages) and are arranged in tabs of 9 BlueNotes each. The image of the Lights Editor window below indicates that there are two tabs of BlueNotes selected within the Light labeled "Room 1:"
BlueNote Messages are often related to one another, and to keep choices simple, this is why they are arranged in sets of nine BlueNote Messages called a BlueNote Tab. BlueNotes within Tabs are the details that are used as variables within one or more Lights. They expand the context of Lights, or allow the users to automate processes in the office very precisely, creating a regimen of care that is easy to follow consistently. In other words, BlueNotes are the protocols that you decide that everyone should be able to easily follow, every time, when a Light is turned on. BlueNotes also allow for flexibility within each Light, reducing the total number of Lights needed in a grid, or a way to create entire sentences without typing.
Several Lights without BlueNotes

Before BlueNotes are discussed, watch the video above to see what regular Lights look like, and how users interact with each one.
Lights that do not contain BlueNotes do not have details in the Action window, which is what is seen when clearing a Light. Notice in the image above, how the three lights being turned on have Room 1 in common. But because they are three different notifications, there is a separate Light for each provider.
In this example, it is unlikely that all three of these lights would ever need to be turned on at the same time. Usually only one doctor is summoned to a room at a time, not all three at once, so having three separate light timers is unnecessary. BlueNotes make it possible to consolidate these three lights into a single light.
On the right-hand side of the image below, you'll notice that there is a "Room 1" light. Without context, Room 1 by itself has very little meaning. However, by adding one more piece of information to the Light, the task now becomes complete.
One Light with BlueNotes

When BlueNotes are used effectively, not only can you consolidate workflow to a single Light, you then are able to automate protocols that everyone in the office is able to follow, every single time. Notice how there is much more than Dr A, Dr B, and Dr C within the "Room 1" light. Instead of a light only having a single function, a light can contain up to 36 different BlueNotes. Each one of those BlueNotes re-define the use of the Light.
The image below shows how to add the same BlueNote tab called "Messages" into three lights. First, a new BlueNote message stating "Need you in clinical" is edited and saved alongside the two others in the Messages tab of BlueNotes. Then the user opens three lights and highlights "Messages" to select this internal menu within the three existing lights "Note for Doctor:, Note for Sarah: and Note for Chris:" Once each of the Lights is Saved and the configuration has been Published, notice how the user can choose the same BlueNote within all three Lights, and that the corresponding popup for each notification is the same color as the BlueNote.

How to create BlueNotes:
• Open System Wide Changes and choose the BlueNotes tab.
• To create or edit a tab of BlueNotes, click on the tab that you wish to add or edit.
• Click on existing BlueNotes to edit each one, or on each blank to add a new one.
• Add other details such as tones, colors, and aging times.
• Close each BlueNote editor by clicking "Save BlueNote."
• Re-label the tab of BlueNotes. The default label will be a number from 1 to 12.
• You can now add the tab of BlueNotes to existing Lights, or create new Lights. In the left-hand menu, tab up to Light Panels.
• To add BlueNotes to an existing Light, click on an existing Light and select each tab of BlueNotes within the light editor by clicking on each one to turn it green. Close the light editor by clicking "Save Light."
• To add BlueNotes to a new Light, click on a blank Light. Edit the Light, then select each tab of BlueNotes within the light editor by clicking on each one to turn it green. Close the light editor by clicking "Save Light."
• Tab to Publish. This saves the file and adds the new Lights and BlueNotes to the Light Panels of all BlueNotes users on the network.
How to use BlueNotes
Since BlueNotes exist the Light Action window, the user will need to open this window by clicking or right-clicking on the Light, depending upon whether or not the light has been set as an Immediate Light or a Prompted Light.
Once the Light Action window is open, left-click once to tag the Light with the BlueNote and turn the Light on immediately. Right click on one or more BlueNotes to add their words as Comments. Right-clicking allows users to assemble multiple BlueNotes together into a full message. If all BlueNotes were added as Comments, regular click "Turn Light On" to display this information on the Light Panel.
Can you show me an example of how a practice can go from single-click Lights to using BlueNotes inside of their lights?
This is a light panel configuration of an actual practice (names have been changed). Notice how every Light is a single click Light, but many of the Lights have the same details in common? Each grouping has the provider name in common, as well as the seven variables (Need Dr. B, Patient dismissed, etc). Because the needs are shared, these details can be added inside of a Light.

Below, see how 28 lights have been consolidated into eight lights instead. The first light in each section is used for a patient out in the waiting room; however, each of the remaining lights are used to manage the patient that is still with the provider, so they can be consolidated as BlueNotes within a room light.

All of the same workflow is there, but now each provider only needs to work from two lights instead of seven. The chances that any two of the BlueNotes would be active at the same time is unlikely, since each of the previous lights are rarely needed simultaneously.
What are each of controls that are available when setting up a BlueNote Message, and how do offices use them?
The Tab seen below represents the most commonly utilized messages that relate to the workflow for every dental exam room and operatory within a single practice. Each of the BlueNote messages have had colors, tones, and timers added to assure that the team members assigned those tasks will be interrupted when appropriate, and will be held accountable to the amount of time that each task should normally take.

BlueNotes are organized into up to 12 tabs of 9 BlueNotes each. In this case, there are four programmed BlueNote Tabs, and the other ones with numbers only have not yet been utilized. This example will explain now to program a single BlueNote Message within Tab name that has been labeled "Ops Tab 1."
BlueNote Message: Type in the precise intention of a task. For instance "Dr. Morrow" by itself without context is not sufficient, because it could either indicate that Dr Morrow is requested, or Dr Morrow is already in a room, so "Ready For Dr. Morrow" can be a more concise way to summon this particular team member.
Tone: An audible interruption designed to represent the specific task. In the example below, any time that Dr Morrow is summoned, she will hear the tone selected. Other doctors will not respond to this tone, since over time it will become a discreet stand-in for her name. She will also find it beneficial not to stop an activity to look at a message on a screen if she becomes audibly aware of a notification first.
Color: If no color is selected, a BlueNote Message will default to White. Otherwise, choose a preset color, or select "More Colors" and "Custom" (not shown) to set colors exactly. The Color may need to be shaded to make sure that it is readable behind white or black lettering. Note that the lettering color cannot be adjusted when choosing colors. If "Ready for Dr Morrow" is the only time that the light turquoise/blue color appears in BlueNote, the doctor will be able to easily when a room is ready for her, since she will begin to exclude all other colors in the system and focus on only her tasks.
Aging: The office can use a BlueNote Message to set an expectation for how long for each task should take to complete. When Dr. Morrow has indicated that her goal time to be in a room in five minutes or less, then the message " Ready for Dr Morrow" can have its Aging time set for 5 minutes of Green time, which indicates that this is acceptable. There always should be a buffer of time between the Goal (green) time and the Unacceptable (red) time, so the warning time can also be set. in this case, Dr Morrow is permitted to have 10 minutes of Warning (orange) time between her Goal and her Unacceptable time. Note that both the Goal and Warning time are where the Aging time is set; the third time is a calculation of the Goal time plus the Warning time. When this is set, at the 15 minute mark, any Light that is left on for 15 minutes will be green for the first five minutes, will turn orange at the five minute mark, and will age to red at the 15 minute mark.

There can be up to 9 BlueNote Messages organized into up to 12 Tabs, for a total of 108 BlueNote Messages. Keep in mind that a single Light can only contain a maximum of of the 12 tabs. See the Related Articles below for more information about editing Lights.